Thursday, June 30, 2011

10 uh-oh no-no's!!

We've all made these mistakes at some point BUT this topic wouldn’t be especially useful without learning how to avoid these major makeup mistakes again! Here’s a rundown of the mistakes and how to overcome them.

Disney Rainbow face


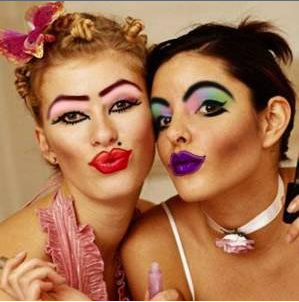
  • If you want to wear bright makeup then go for it,  BUT pick 1 feature- eyes, cheeks, OR lips- not all of the above.
  • If you love blue eyeshadow, then wear it in moderation- you can apply on the outer part of the eye or smudge along the lashline, but not all over the eyes.  If you must wear the blue eyeshadow all over the lids, then put a neutral color in the crease to tone it down.
  • Choosing a dark blue vs a bright blue also works- it isn’t as overpowering but still has that blue color you are aiming for!  
Overbronzer

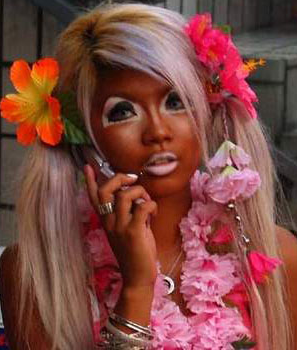
  • Rule #1:  For all that is holy, DON’T APPLY BRONZER ALL OVER YOUR FACE.   Just because you want to look tan, doesn’t mean bronzer all over will make you look like a golden goddess….
  • Apply a darker bronzer just under the cheek bones and a bit on the forehead, or if it’s a lighter colored bronzer, you can apply on top of the cheekbones and down the nose.
  • Make sure your bronzer is just 2 shades darker than your skin- any darker than that, and it starts looking orange and fake.  My favorite bronzer is NARS Laguna Bronzer

Sticky Lips


  • The trick to avoiding sticky lips, is to find the correct lip gloss.  My favorite non sticky ones are MAC lipglasses and NARS lipglosses.
  • Don’t apply too much lip gloss.  If it starts dripping down your lips, you know it’s time to back away from the lip gloss tube….
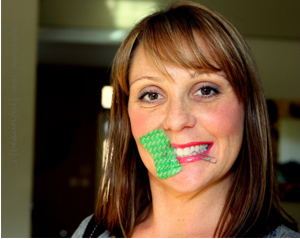
Lipstick Teeth


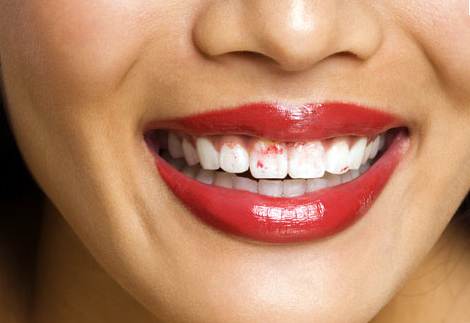
  • After you apply your lipstick, stick a finger in your mouth, close your lips around it and pull your finger out.  It will take off the lipstick on the inner part of the lips that rubs off on your teeth.

Clown Blush


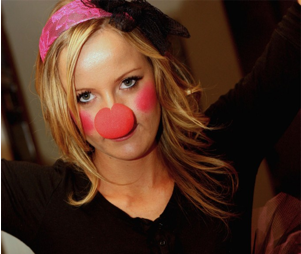
  • Apply blush a little bit at a time- you can always add more, but it’s very hard to take away.
  • Choose a blush that is 1-2 shades darker/brighter than your skin.  So, if you have medium color skin, go for a medium pink or a medium coral color- if it’s a bright pink, you’ll have the clown look. If it’s a pale pink, it won’t show up much.  

Cakey Face


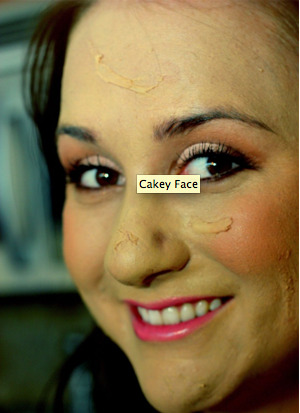
  • This comes down to one thing:  DON’T APPLY TOO MUCH POWDER.  Powder is a wonderful product- it gives a matte look to the face and makes your foundation last longer, but it can also be your worst nightmare since it’s easy to apply too much and get a “cakey” looking complexion.  Apply powder only where you feel you need it- generally on the T zone (nose, chin, and middle of forehead).  If your skin is dry, you may not need powder at all.
  • To apply a thin layer of powder, I prefer using flat powder puffs instead of brushes as you can control how much powder you pick up. Pat the powder on instead of swiping, and it will apply a thin layer without messing up your foundation underneath.

Spider Lashes


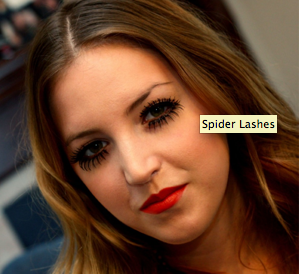
  • Throw away your mascara that is more than 3 months old.  If it’s older than that, it can grow bacteria and start to get clumpy.
  • If you want to apply 2 coats of mascara, do it quickly as once it dries, it’s easy for it to clump on your lashes.
  • When you pull the mascara wand out of the tube, scrape the excess off the end of the tube so you don’t apply too much mascara at once.
  • Finally if you still have clogged lashes brush them through with an old tooth brush.
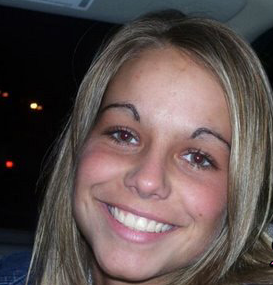
Overdrawn Eyebrows


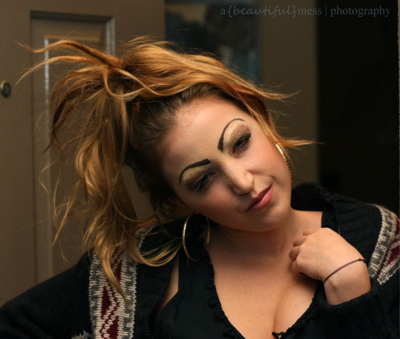
  • If your eyebrows are very light or super thin, you can still fill in with an eyebrow pencil, BUT use sparingly and apply in short strokes just where the “bald” spots are.  For the rest of your brows, use a matte eyeshadow or brow powder with a small angled brush- it looks less harsh and more natural.  
  • If your hair color is light, you want your brows to be 2 shades darker than your hair color.  If your hair is dark, your brows should be 1-2 shades lighter.

Pasty Face


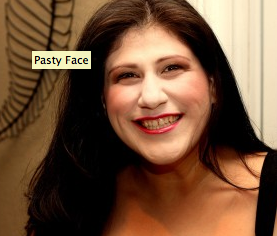
  • This usually is the result of too light a foundation… It can be very hard to notice until you walk outside in natural light or see pictures of yourself and see the clear difference in color between your face and your body colour Do your best to do your makeup in natural light or a well-lit room so you can see exactly if your foundation matches your body.
  • Mix your foundations.  I keep at least 2 colors on hand to mix on those days that I may have gotten a slight tan- I keep one in my lightest skin color (what my skin looks like in the winter months), and one 2-3 shades darker than that.  I can then custom mix and get the perfect color by adding more dark or lighter foundation.
Over-tweezing (or ignoring) your eyebrows.

  • The brows are such a central and important feature on your face. When they’re well groomed they can enhance your eyes and your entire look.
  • If yours are out of control, it’s worth the time and money to let a professional take tweezers to them. Get a referral from a friend in order to find someone you know will do a good job. The worst thing you—or a pro—can do is to take off too many brow hairs.
  • As we get older, the brows naturally become more sparse, so if you tweeze your brows too thin, they might never fully grow back. If you follow your brows’ natural arch—but clean up the areas over, under and between brows—you’ll find the best shape. Visit a pro for a tune-up every few months and you should be able to keep them groomed on your own in between.
And one more thing....Don't overdo the shimmer! You can go from dewy and pretty to disco grease ball in no time if you overdo it! Keep it light, use a fan brush to blend highlight powder or cream on certain areas of your face, NOT ALL OVER! See pictures below on where to apply highlight and contour. I see so many people make this mistake of thinking because it's summer that the shimmer should be in overload...save others from the blinding glare and ease up on that! :)


I hope you all enjoy this as much as I did!!

Monday, June 27, 2011

Perfect Summer shadow!

I am in love with these creme shadows! Summer time isn't the time to be packing on the heavy colors for a day out at the park, beach, wherever so these creme shadows from Revlon are the perfect thing! A little tinted moisturizer, creme blush, lil mascara, lip gloss and these creme shadows and you're good to go! You will have the perfect bronzed, sheen look that everyone will envy! I bought the quad kit in Skinlights and it's perfect. The colors are not very pigmented so if your expecting that you will be disappointed. But if your wanting a light sheen (not shimmer) then this quad kit is for you! I found mine at Walmart for $4.99 so the price is reasonable too. You just swipe the pot with your finger to warm it up and then lightly spread it across your lid. If you have a hard time blending then cremes are for you! You will master the look of blending with these. I've heard some reviews state that creme shadows are not the way to go if you have oily eyelids (which I have) but I've found the easiest way to prevent this from happening. If you crease easy, just swipe your finger across your lid throughout the day and it will deposit the color back in the right places! That's the beauty of cremes and oily eyelids. We can wear it too! :) ( I also dab a little face powder over the creme shadows for more staying power. I use a big face brush to do it, just tap it on the eyelid don't rub it on).

Can you tell I'm excited about this?? I'm going to get more colors now that I know I love them! So stay tuned to see what I think about the other color kits. There are many different ones to choose from, from very earthy natural to bright spring colors. Here is a link to Revlon's website so you can check out all of the different colors they have. --------> http://www.revlon.com/Revlon-Home/Products/Eyes/Eye-Shadow/Revlon-Illuminance-Crème-Shadow.aspx

 As always check with Amazon for great discounts before you make your purchase. You can also use these as a base before powder shadows or as a highlight on your cheekbones (the lighter shades anyway). It's great for the teen that's experimenting with makeup as it goes on so lightly or for the woman who just likes a little something.

 I couldn't be happier with this drugstore purchase! If you have any of these or you go out and buy any, let me know what you think about them.

Be blessed and bronzed Always!! :)

Friday, June 24, 2011

Makeup Geek's go to list for Brushes

I adore Marlena of Makeup Geek. She is so sweet and considerate to budget friendly people and I love how she takes the time to explain things without me feeling like she is rambling like so many other vloggers and bloggers do. This list is probably my top pick of what to get for brushes as so many others gear their purchase on very high end products and personally for me...I don't have $30+ to spend on a brush! Hello?!?! Brushes do matter so much though so I encourage you to check out this list! And remember, whatever brushes you have or get...clean them bad boys every week! :) Here is Marlena's pick for brushes.

(Side note-Sigma and Mac and all those other brush suppliers are really great!! If you can afford them they are for sure a great investment)


Whether you are starting your career as a makeup artist, or love to apply makeup on just yourself, there’s certain tools you need to complete a variety of makeup looks.   I’ve always stated that the 2 things that make or break a makeup look are your primers and your brushes.

Eyes

There are 4 main brushes you should have for your eye makeup…..

This brush is used to pack on color to the lid.  It needs to be flat so you can pat on the eyeshadow over your eye primer,  and it needs to be stiff so it picks up plenty of color.
The MAC equivalent is the #239- the Eye Shader Brush     (MAC)
  • Cost:  $24.50
A cheaper alternative is the MUG Eye Shader Brush     (Makeup Geek Store)
  • Cost:   $4.29
Both brushes work well in packing on color, and both are stiff.  The MAC one is a bit larger and thicker than the MUG one.  Technically, the MUG one is a concealer brush, but does not work well at all for concealer- it is MUCH better at packing on eyeshadows or pigments…

This brush is used for creating the perfect smoky eye, for feathering in darker eyeshadows, and for applying more color to the crease.  This is my all time favorite eye brush!
The MAC equivalent is the #217- the Blending Brush     (MAC)
  • Cost:  $22.50
A cheaper alternative is the NYX Professional Crease Brush     (Makeup Geek Store)
  • Cost:   $8.89
These brushes are VERY comparable- the only difference I can tell is the NYX one is a smidge shorter

This brush is just like the stiff dome brush but much softer- it creates a much softer blended look.   It is used for blending shadow under the brow, applying a softer amount of color in the crease, and even for applying powder under the eyes to prevent that creasing throughout the day.
The MAC equivalent is the #224- the Tapered Blending Brush     (MAC)
  • Cost:  $28.00
A cheaper alternative is the MUG Soft Dome Brush     (Makeup Geek Store)
  • Cost:   $7.49
These brushes are very comparable- the only difference is the MUG one is a little bit smaller, which is actually better as the MAC one can be a bit too large for smaller eyes…

This brush is used for smudging eyeshadow under the lower lashline, for smudging eyeliner, or for creating a very defined crease.  The smaller tip allows for more precise lines.
The MAC equivalent is the #219- the Pencil Brush     (MAC)
  • Cost:  $23.00
A cheaper alternative is the Essence of Beauty Crease Brush Duo     (Makeup Geek Store)
  • Cost:   $9.99
Many companies sell similar brushes, so you can find this one fairly easily. The Essence of Beauty one has 2 sizes, so is great if you have a smaller area to work with and need a smaller brush.  They are also a bit softer than the MAC one.

Face

There are really only a few brushes you need for the face- it really depends on what all you wear.  But these 4 are the ones I use daily…

This brush is used for stippling foundation onto the skin for a more airbrushed finish.  The bristles need to be stiff in order to hold up to the foundation and not streak.
The MAC equivalent is the #130- the Short Duo Fibre Brush     (MAC)
  • Cost:  $38.00
A cheaper (and better) alternative is the MUG Foundation Stippling Brush   (Makeup Geek Store)
  • Cost:   $12.98
I am completely honest on this one- the MUG one works much better for me than the MAC one.  I say this as the MUG one has stiffer bristles which allows for more of a stippling effect and doesn’t streak like the MAC one.  Granted the MAC one is softer against the skin, but it doesn’t give the airbrushed finish as much.  These 2 brushes are quite different, but are used similarly.  I do wish the MUG one was a bit softer, so I wash mine with a bit of olive oil then baby shampoo.

This brush is used for applying darker powder under the cheekbones to create a contoured effect- it makes the cheekbones stand out and your face look slimmer.  This brush isn’t absolutely necessary unless you want to contour your cheekbones, but I recommend having if you are a makeup artist…
The MAC equivalent is the #109- the Small Contour Brush     (MAC)
  • Cost:  $32.00
A cheaper alternative is the MUG Deluxe Contour Brush (Makeup Geek Store)
  • Cost:   $7.89
Now these 2 brushes are VERY different, but they work the same way.  I actually prefer the MAC one as the rounded edge allows me to get under the cheekbones for that more “chiseled” look.  If you are just starting to contour though, you may want the angled brush as it’s a little easier to work with.   If you do find an angled brush, make sure the bristles are stiff as you need enough powder to actually contour your cheeks- don’t use the fluffy blush brush as it will apply color all over the place.  Just my helpful tip for the day ;)

This brush is used for applying powder blush to the cheeks.  It needs to be angled so the blush is easier to blend, and it needs to be soft so it doesn’t pick up too much color.
The MAC equivalent is the #168- the Large Angled Contour Brush     (MAC)
  • Cost:  $32.00
A cheaper alternative is the MUG Blush Brush   (Makeup Geek Store)
  • Cost:   $7.49
These brushes are VERY comparable- I honestly cannot tell much difference between the two.  They’re both soft and both apply blush beautifully!

This brush can be used for many things- light application of foundation, applying a small amount of blush to the cheeks, or for highlighting the top of the cheekbones.  My favorite use is for highlighting as the bristles are soft and pick up little color, and it is small enough to not cover the whole face with shimmer.  This isn’t an absolute necessary brush for your kit, but definitely nice to have.
The MAC equivalent is the #188- the Small Duo Fibre Face Brush   (MAC)
  • Cost:  $34.00
A cheaper alternative is the MUG Cheek Highlighter Brush   (Makeup Geek Store)
  • Cost:   $6.98
These brushes are VERY comparable- I honestly cannot tell much difference between the two.  Just like the blush brushes, they’re both soft and both apply shimmer beautifully!
.
I hope this was helpful for all of you!  For the lips, you only need a small flat brush to apply lipstick IF you are working on a client- most of us apply lipstick straight from the tube :)

Thursday, June 23, 2011

Fake summer sun! Malibu Tanning or Tanning Bed in a tube??

So if you live anywhere close to Northern Indiana you know we are experiencing an extreme lack of sun! I personally enjoy leaving work to feel the sun on my face but I'm not sure what that would feel like anymore. :) So I have a couple alternatives.


Shout out to Malibu Tanning because their beds rock! I've never been disappointed with their beds or their service ever. I could be a little bias since I did use to work there....but still they rock! So if you are ok with tanning in a tanning bed, go there. The prices are amazing and they have a huge selection of tanning products from phase 1 and up, moisturizers, etc. Here is a link to their website so you can see where the locations are and what not.

http://malibu-tanning.com/


Some of you don't like to tan in the tanning bed so I recommend Too Faced Tanning Bed in a Tube. You can get this for your face and body (separate bottles). I love these self tanners!!! You get the most amazing color and there is no gross smell. It's actually smells good! :) You can pick this up at Sephora for I believe $25. Always check Amazon too for a better deal. I can't say anything negative about these products. If you follow the directions, you will have a streak free amazing glow! Here is the link to the Too Faced website for the body tanner ------>

 http://www.toofaced.com/product_template_003.aspx?tab_id=001&cat_id=47&dept_sub_id=23&dept_id=9


Here is the link for the face tanner ------->

http://www.toofaced.com/product_template_003.aspx?dept_sub_id=23&dept_id=9&cat_id=48

My daughter actually used this and she has sensitive skin and it didn't break her out or anything.

I highly recommend Malibu Tanning, and Too Faced tanning products! At least until the sun comes back right????

To safe tanning and glowing skin!

Tuesday, June 21, 2011

WAKE UP!!!!!! (and simple ways to do it)

1. BUFF TO GLOW. Use an exfoliating cleanser or enzyme mask to boost circulation, slough off dead cells and de-clog pores. Healthier-looking skin surfaces in seconds.
2. LIFT YOUR BROWS. Tweeze away droopy hairs that curve around eyes and exacerbate droop. Use pencil and powder to fill and extend brows outwards.

3. USE A FACE PRIMER. Prevent makeup from creasing, caking and settling in expression lines and fill the pores on your nose in one step. Your face won't look like an unmade bed.

4. GO SHEERER AND WARMER WITH FOUNDATION. Yellow toned foundation freshens grey, pasty, stressed skin. Skim a damp makeup sponge over you face to remove excess coverage and create a dewy skin-like look.

5. WAKE UP EYES WITH HIGHLIGHTER. Piling on skin tone concealer emphasizes under-eye bags and puffiness. Use a highlighter pen or soft white pencil to brighten eyes at the inner eye corners and add sparkle.

6. CORRECT CIRCLES WITH TINTS. Hide super-dark circles with tinted shades- orange/yellow concealer for blue/purple circles, mauve/rose for brown circles. Skin-tone cover-up won't do it.

7. KEEP EYE MAKEUP CLEAN AND CRISP. No smudgy or smoky- a crisp eye compensates for loose skin and pouches below. Dot a felt-tip black liner beneath the top lashes (hold lid taut and lift it to do this) to keep definition sharp.

8. GET OUT THE BRONZER. Apply a skin compatible bronzer (not too dark) in a C-shape to cheekbones and forehead, on chin and down the neck for radiance. Skip the nose.

9. APPLY CREAM BLUSH ON CHEEKBONES. Forget about apples. Blush goes high on the cheekbones away from the nose and nasal labial folds. Cream blush makes bronzer look real and adds life to your face.

10. BRIGHTEN LIPS. Swap nudes for clear pink, apricot, coral, rose or raspberry shades that bring attention to lips not lines.

And don't forget....LOTS OF SLEEP AND WATER! Nothing stresses out the skin like lack of sleep and water.

Here's to refreshed skin!

Monday, June 20, 2011

Wet n Wild Greed Palette video


I am a HUGE fan of Wet N Wild eye shadows! Let me stress that I do NOT like any other products from them so far from what I've tried. The eyeliners, blushes, mascaras, etc I'm not a fan of. I do think that the lipsticks are wearable but I wouldn't oh and ah over them, but the eye shadows never cease to amaze me! The pigmentation is crazy! Every time I get a new palette from Wet N Wild (which let me add the price is awesome) I always go to YouTube to see other viewers ideas on how to wear them. I would say I'm good at applying colors just not as good with coming up with color combos  (I'm not too proud to admit that) so I always go there and see how other people do it and try that. I found a video that I love! It's so easy to mimic and it looks so pretty and soft. The peaches looks amazing with the grays and smokey blacks and then paired with the light pink cheeks and lips, it looks so pretty! So without anymore rambling, here we go! Be sure and let me know if you would like to see any other kind of look and I'll scope it out for ya!

Tuesday, June 14, 2011

Alcohol and Alcohol

Ok no I'm not going to tell you how to mix drinks :) But I am going to tell you about something I found out over the weekend! Two things, here we go!

I was talking to someone about their highlights and how they kept them so vibrant and blond and they said VODKA! I couldn't believe it! How in the world does Vodka help your hair???? Now I'm sure this could be old hat to some of you but this was news to me so I had to share it. I started surfing the Internet for this "myth" and sure enough faithful Beautylish had an article about it! And apparently there is another "mixed drink" for brunettes too! Here is what the article said about it:

Vodka Spritzer
  • 2 parts seltzer
  • 1 part vodka
"Vodka has a clear blue tone to it, so it lightens hair without it going orange. You can also clean out red brassy tones with this mixture," says Michael.

Rum Fizz
  • 2 parts seltzer
  • 1 part rum
"This is how models in Brazil get caramel tones in their hair. They spray a little in their hair and go out in the sun without the hair turning brassy," says Michael.

Sunny Side Up Highlights
  • Egg yolk, beaten
"Straight egg yolk has the ability to lighten hair because of the natural acids in the yolks. This is what they do in Spain. It gets gooey and sticky though, so you only want to leave it in your hair for an hour," Michael says. "If you apply this with foil or plastic, it's a natural, at-home highlight." Do not sit out in the sun with this mixture, unless you're okay with having scrambled eggs in your hair!

How uber great is Beautylish for all of their amazing articles on everything beauty and health??? I highly recommend checking this blog out for sure. If you try the alcohol, let me know how it worked for you! I guess you just spray it on your hair before going into the sun. Putting a braid in your hair or putting it in a bun before you spray it will give the best results :)

Ok on to the next one:


Those of you that know me know that once a year at the beginning of warm weather when the sun is bright and beautiful I always forget to protect my lips and the bottom one gets burnt and it's pure torture for about 1 and 1/2 weeks. I have tried everything to speed up the burn but nothing would work. I couldn't use Abreva or other cold sore medicines because that would make it worse since it wasn't a cold sore, it was a burn. So once again I go to the world wide web and started googling burnt lips and blisters on lips and saw a lot of people put alcohol on their lips right after they were out in the sun. It worked!!!! We were at a company party this past weekend and there was an overcast so of course I didn't think to protect my lips. By that evening my husband noticed that I was getting two little dark spots on my lips so I immediately started rubbing 80% rubbing alcohol on it. I did it about 4 times a day (and yes it stung a little) but the end result was so worth it! I also used 45spf lip protectant in between the alcohol and never saw a blister or anything. So to clarify, this remedy is with rubbing alcohol not drinking alcohol. I challenge you to try this if you ever have had issues with your lips burning or getting cold sores as it works well for that too. (I did read some bad reviews on alcohol for cold sore, some said it didn't work, but it was about a 60/40 split so give it a try)

Monday, June 13, 2011

NYX Buy 1 get 1 50% off at Ulta!


Another great sale is going on at the Mishawaka Ulta right now! I love NYX products so I'm always on the prowl for discounts (I won't buy anything unless I have a coupon or there is a discount through the store or website).

Check out all the great products that NYX has to offer! You can't beat this great deal!

http://www.ulta.com/ulta/browse/category.jsp?brandId=xlsImp8900002&minPr=&viewAll=y&categoryId=cat50003&rating=&maxPr=&pageName=&sortBy=&promoPage=

One of the things I'm scoping out this weekend is the NYX Eyebrow Push-Up Bra Pencil.


I've heard good things about it so I'm going to try that out and who knows what else I'll end up getting. What are your favorite products from NYX??

Sunday, June 12, 2011

50's photo shot!!!

I quickly got some pictures from Heather of Yellow Bee Photography!! Saturday we had a super fun photo shoot! The pictures came out soooo good! As I knew they would. Heather is so talented! Look her up at Yellowbeephotography.com. Here are some pictures from the shoot. Be sure and let me know what you think about the makeup. I kept it very dramatic on the eyes, not a lot of blush or anything and either nude lips for some shots or red lips for others. Janell was cutesy and fun and everybody was awesome! (inside joke between Heather, Janell and myself of the cutesy and awesome stuff).

Janell- you are great to work with! You took direction so well! Could modeling be in your future???? xoxo

Here are some pictures!


Thursday, June 9, 2011

BIRCHBOX for June arrived!!!!!!!!!


I am insanely excited about this month's shipment of goodies! Birchbox has truly outdone themselves on this one. For how I felt on the last shipment, they have been redeemed! I'm going to jump right into what I got so you guys can see the awesome (and huge) samples! Make sure you sign up for your monthly samples! You will get samples that are custom to your wants and needs and make sure in the where did you hear about us box you put me! (just put my blog address that works!) Ok here we go!................


Kate Spade Twirl Perfume:
This flirty scent feels carefree and joyful-just the thing to wear on your adventures at home.


I love the smell of this perfume! It's light and not overpowering but it has a smell that lasts all day. I wore this yesterday and kept telling my daughter to smell my wrist because I couldn't get enough of this. It has a summery earthy smell and it's fabulous!

Laura Geller Baked Blush N' Brighten
Made in Italy, this swirl of warm and cool tones is infinitely versatile-dust your cheeks for a flattering flush or use the lighter shades as a highlighter.


First let me say that this sample is HUGE! It's comparable to MAC face powder compacts or a drugstore face powder compact. I was amazed at the size of this "sample". I wouldn't even call it a sample. I think I just got blessed with the full size :) Anyway, this compact is also amazing! It's so creamy and insanely pigmented. I brushed my finger across it when I first got it and couldn't believe the color that came off. This gave my face a beautiful natural bronzed highlighted glow. It's great to use as a soft contour also. I used a kabuki brush and swept it across my face softly to get that highlight and then I used a contouring brush (not sure what kind it was) and put a little more on the brush to contour and it looked like two different powders but blended so well.

Oscar Blandi Olio Di Jasmine Hair Serum
Banish frizz and flyaways with this fast-absorbing serum. Work it through dry or damp hair to add moisture and gloss-no blow dryer required.


So I got my hair done and highlighted Wednesday night and couldn't wait until I could wash my hair and try this and I did and I LOVED IT! It only took a very small amount and I rubbed it in my hands and scrunched it in my hair. I didn't need as much hairspray to give it that "done" look because the serum made my hair look so healthy and shiny, not to mention is smells super good! It has an earthy smell kind which I always love for my hair. It didn't weigh my hair down and it lasted all day. I couldn't believe the difference it made in my hair!

Pangea Organics Toner and Facial Cream
Laced with mandarin and lime, this energizing toner is a skincare staple and ideal on-the-go refresher + facial cream.


I'm getting the cleanser for this so I will have the whole regimen because this stuff is yep you guessed it amazing! After I cleaned my face with my stuff, I spritzed my face with this toner about 3-4 times and it left a cooling tightening feeling. I couldn't believe how refreshed my face looked! I added the cream which moisturized so well and it didn't take much at all to reach all of my face. This has an earthly smell to it also so it isn't strong or overpowering when you spray your face. There is no burning of the eyes afterwards. I can't wait to see what the cleanser has to offer.

Herban Essentials Orange Towelettes
Infused with pure orange oil, these little guys are detoxifying, germ-killing, and mood perking


I have to be honest in saying that I haven't tried these yet. I'm not sure what I'm waiting on but I feel like I need to find the right moment for them :) From what I gather they are cleansing wipes. Here is what the description from Amazon says:


  • Herban Essentials essential oil towelettes are made with the highest quality pure essential oil


  • Not only do they smell amazing, but they are naturally antibacterial and antiseptic as well


  • The most common use for the towelettes is to cleanse hands and kill germs


  • There are millions of ways to use these wonderful towelettes!


  • Some have found orange oil to be a relief for depression, anxiety, high blood pressure and even hiccups


  • I love these samples!!! And remember if you order any of these samples you get a discount from Birchbox! (I would check Amazon also) :)

    Be blessed always!!

    Jodi

    Tuesday, June 7, 2011

    Pimples Article from Beautylish

    Did you know that the location of your blemish can tell you how it got there in the first place? Beautylish got the lowdown on "pimple geography" from Dermalogica Director of Global Education, Annet King. Learn why your zits can give you clues about other issues in your body
    The International Dermal Institute created face mapping, a skin analysis system that divides your face into 14 zones that you can individually analyze and treat. "The concept came to us one day as we discussed the fallacy of traditional skin treatment," Annet says. "We always taught classes on Chinese face reading and skin analysis, so it seemed advantageous to combine both schools of thought. The East looks at the body—how the organs are mapped out on the face and their possible imbalance. The West is founded on skin type and condition, product use and habits. Both aspects are so important when treating skin."
    What about skin issues on the body? "There are a lot of sebaceous glands in the chest and back area. It's very common for boys and women who suffer from facial acne to have body breakouts as well. However, if someone who doesn't suffer from blemishes has body acne, look into outside factors. Synthetic clothing, perfume and congesting hair products might be the culprit. Luckily, traditional eastern medicine also addresses body acne as well. In Chinese diagnosis, the chest and back relate to issues in the lungs, if all other reasons have been ruled out." Let's take a look at the different zones on your face and see what triggers acne.

    Zones 1 & 3 (forehead)
    Traditionally, the forehead connects to your digestion. If you break out in this area, improve your elimination by drinking water and eating "whole" foods. You could possibly suffer from a food intolerance (like wheat or gluten).
    Zone 2 (middle of Forehead)
    The middle of the forehead, between the eyebrows, connects to the liver. Congestion and breakouts could be related to consumption of alcohol and rich foods or a food allergy (like lactose intolerance). Avoid eating late at night and cut back on the wine and cheese.
    Zones 4 & 10 (ears)
    The ears connect to the kidneys. If they swell or feel hot, reduce inflammation by cutting down on the caffeine.
    Zones 5 & 9 (cheeks)
    Your cheeks indicate respiratory issues. Smokers or allergy-prone Beauties typically notice fine, broken capillaries and clogged pores. Quit smoking and begin an antihistamine regimen (if you're not on one already) to clear this congested area.
    Zones 6 & 8 (eyes)
    The eyes, like the ears, connect to the kidneys. Diminish dark circles and brighten those peepers by drinking more water and streamlining your digestion.
    Zone 7 (nose)
    Your nose indicates blood pressure. If it becomes red and abnormally inflamed, your blood pressure level is probably higher than usual.
    Zone 12 (chin)
    Chin breakouts are regulated by hormones and tend to freak out before and after your period.
    Zone 11 + 13 (corners of your mouth)
    The corners of your mouth connect to the ovaries, and often break out during menstruation.
    Zone 14 (neck area and temples)
    Breakouts in the neck area and temples relate to adrenal stress. Our two adrenal glands, located above our kidneys, secrete vital hormones. If these glands function abnormally, you may feel sluggish and stressed throughout the day, and you could break out. Remember, the skin on your neck is just as important as your face, don't forget to take care of it!
    Beauties, what do you think about this east-meets-west approach to skin care? Do you notice blemish patterns on your face based on these guidelines?
    Annet King, Director of Training and Development for The International Dermal Institute (IDI), is both CIDESCO and CIBTAC certified with more than 18 years of skincare experience. She develops the extensive IDI curriculum, oversees the training of nearly 200 instructors worldwide and is recognized globally for her training abilities, expertise and knowledge of all things skin and body related.